Sizes, Specs & Installation Instructions
Sizes
Installation requires Moderate Handyman Skills & Tools
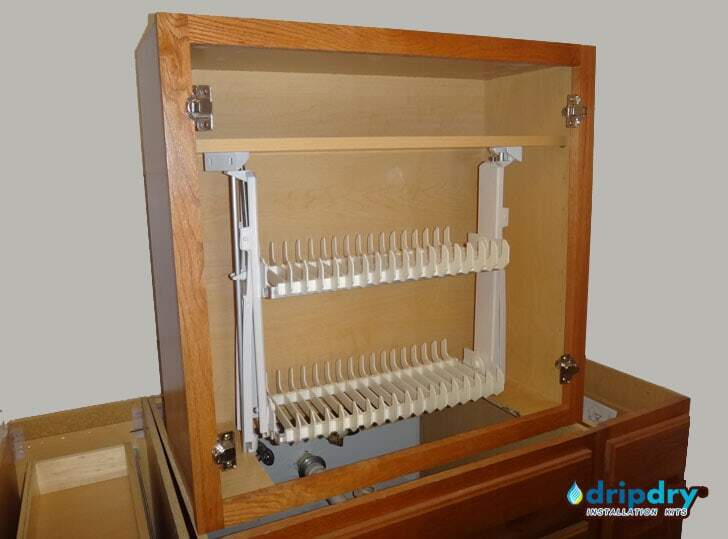
DripDry Classic (DDC) Pull Down Racks:
• Colors: White / Silver – Aluminum
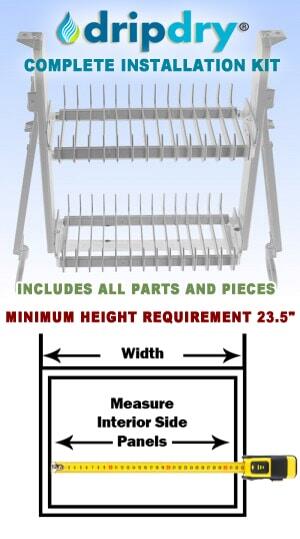
• Includes: All parts and pieces to mount a two – level pull – down set of racks, a template, a cutlery caddy and manual.
• Height : 22.20″ inches (56.39 cm) minimum height is required. DripDrys can be mounted higher or lower within the cabinet, depending on the cabinet structure and preferences.
• Depth: Rack depths are 8.58″ inches (21.79 cm) – intended for standard cabinets – depth of 11-12” inches (28 – 30.5 cm).
• Sizes differ by width only. All sizes have the same height and depth:
· Small
Cabinet’s interior width is at least 18.5″ inches (47 cm)
* Small holds 36 plates.
· Medium
Cabinet’s interior width is at least 22.4″ inches (57 cm)
* Medium holds 44 plates.
· Large
Cabinet’s interior width is at least 26.2″ inches (66.5 cm)
* Large holds 52 plates.
• Note: the widest width (due to pull-down weight restrictions) is our Large stock size. We do not manufacture pull – downs for any wider than our Large stock size.
• Preferences: All DDC sizes require the minimum height requirement (22.2” inches) (56.39 cm) for racks to completely disappear into the upper position within a cabinet. In order to lock racks into the lowered position, handles are required. Handles are 4” inches in height at each side. These handles will protrude from under the cabinet bottom ledge.
HIDDEN HANDLES If you have at least 26.2” inches (66.55 cm) interior height, you have the option to build a ledge 4” inches (10.16 cm) above your cabinet’s bottom to hide the handles. To do this, add an additional 2” inches (5 cm) for width on both sides so the locking mechanism works and your hands have space to grasp the handles.
DDC TOP CONNECTORS can mount to the cabinet ceiling, a shelf, a vertical shelf, or ledges built in. With racks extended to the lower position, the distance from top to the underside of the drip tray is 33.8” inches (85.85 cm), or 37.8” inches (96 cm) at bottom of handles. In the lowered position, you create 22.2” inches (56.39 cm) height for large pots to dry.
DripDry Custom Width – Static Racks:
• Colors: White / Silver – Aluminum
• Includes:Two (2) static rack shelves to fit a cabinet of any specified width, with adjustable fasteners to mount on interior side panels of a cabinet. Comes with a cuttley caddy.
• Depth: Rack depths are 8.58″ inches (21.79 cm) – intended for standard cabinets – depth of 11-12” inches (28 – 30.5 cm).
• For racks over 35″ please contact us for pricing.
• After Check Out – contact us with your Order Number and its specifications.

Installation Instructions
The bottom of the cabinet is not attached or is removed altogether. Alternatively, a frame is cut out from an existing bottom of a cabinet. DripDry dish drying rack kits include all parts to mount the system into any cabinet. Adjustable fasteners position the Dish Rack DripDry snug into place (as cabinets slightly vary in precise size).
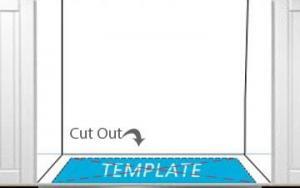
How the Template Works
DripDry templates represent the exact measurements of the rectangular hole that should be cut out of a cabinet-floor. If your cabinets are completely custom made, the dish drying rack DripDry stencil represents the exact measurement for a frame to be made, with the points indicated to use the anchors that come in our kit. To use a DripDry stencil-template as a self-guiding tool, both the interior width and depth of the cabinet must be known. With these two parameters, the installer measures the interior width and depth in able to properly center the template. Note, custom cabinets have more options to place the template higher or lower depending on design. The stencil also provides a line where the installer should apply a DripDry “sealer-strip” (provided in the kit) or their own barrier strip to protect the edges of wood from humidity.
DDC20 stencil is a cut-out width of a rectangular hole to saw = 16” Inches + 9/64” (41cm)
DDC24 stencil is a cut-out width of a rectangular hole to saw = 20” Inches + 5/64” (51cm)
DDC28 stencil is a cut-out width of a rectangular hole to saw = 23” Inches +13/16” (60.5cm)

Fits All Cabinets
Frame-less Cabinet
Shaker Cabinet
Framed Cabinet
Face-framed Cabinet
Ready-to-Assemble
Wide Cabinet Custom Cabinet

Add a bottomless or open bottom cabinet above a sink in your CAD kitchen plan software and build a fabulous kitchen. See our gallery.
We offer Professional Installation
Let us connect you to a professional installer or Ask us about becoming an installer.
We currently have Professional Installers in the following areas:
United States: Connecticut, South Florida, New Jersey, New York
Quebec, Canada and Jamaica
We highly recommend our Professional Installers who specialize in Dish drying rack installations for frameless, framed, face-framed, Ready-to-Assemble, wide, and custom-made cabinets. Certified DripDry Professional Installers have experience and demonstrated craftsmanship.
See DripDry Installations
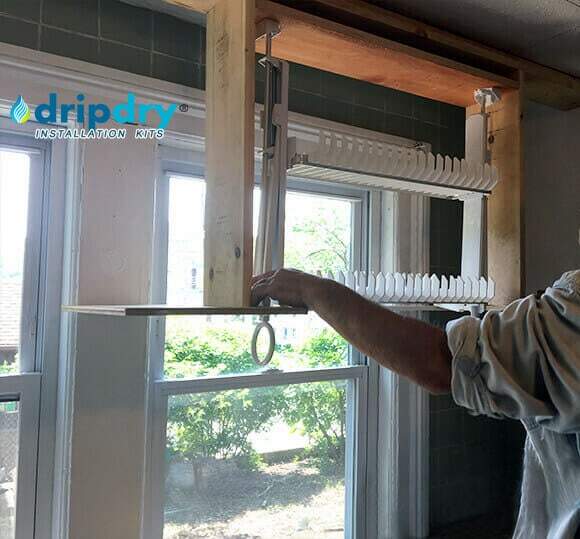
Don’t have a cabinet above a sink, and no counter space? This solution is a handyman’s best friend. Just hang it from the ceiling, above the sink!
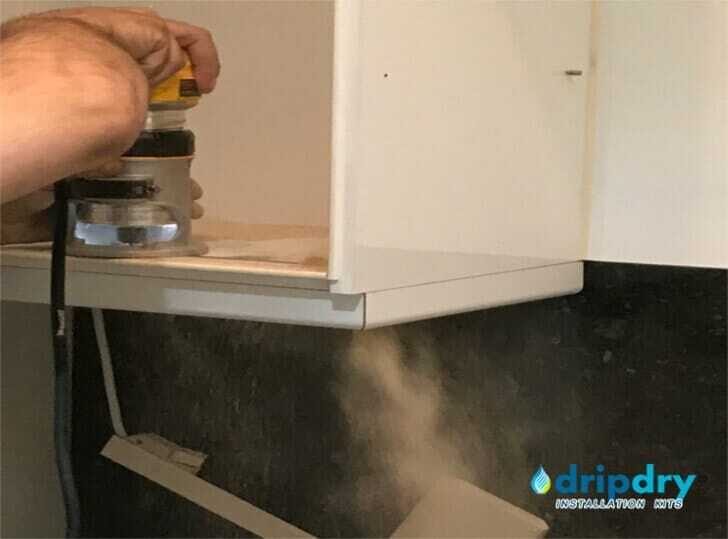
After you have traced around the template stencil to mark the bottom cabinet ‘floor’, use a jigsaw to saw out the marked area
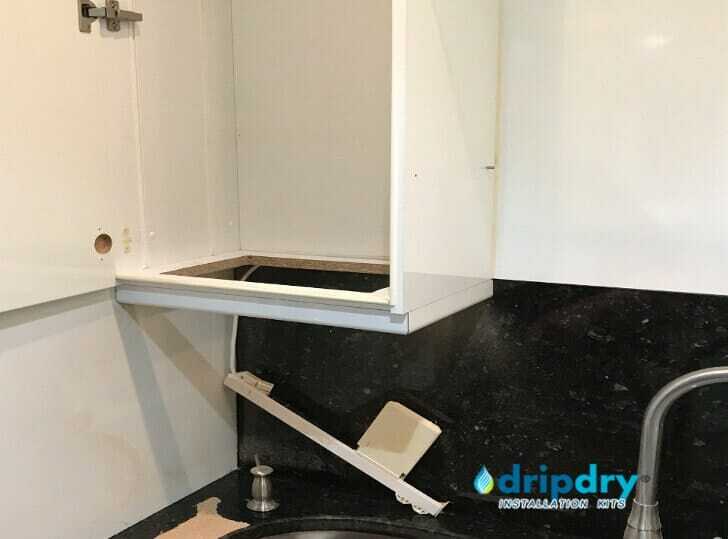
After you have removed the marked area, your cabinet bottom is ready to drip dry! Now mount the racks in using any of the kit’s parts that work for you
Cabinet from Home Depot was modified, the drain racks installed, before mounting on the wall
Determine which size will fit into your cabinet. The installation kit includes everyting you’ll need. Call us with any questions!
Home Depot cabinets are stock cabinets that can be modified. Home Depot has CAD to help design a kitchen where the wall cabinet is above the sink
Frequently Asked Questions. Read Here.
We recommend these businesses for your DripDry installation and your kitchen design:
Los Angeles, CA: www.dezignblue.com
wilsonn374@aol.com
323-496-9104
Kailua, HI: www.universalinteriorsllc.com
nancy.uillc@gmail.com
808-348-1220
Baltimore, MD: www.design613.com
ellene@design613.com
410-764-1669
New York, NY: www.leibdesigns.com
212-707-8448
Bally, PA: www.longacreco.com
dmoyer@longacreco.com
610-845-2261
Outside the USA:
Huixquilucan, Mexico: Dalia, Phone 521-5555-070290, Email dalis.ben@gmail.com
Queensland, Australia: Ameneh, Email ameneh.shahaeian@gmail.com
How does the DripDry hidden dish drainer contribute to the environment? Read Here